


-43%
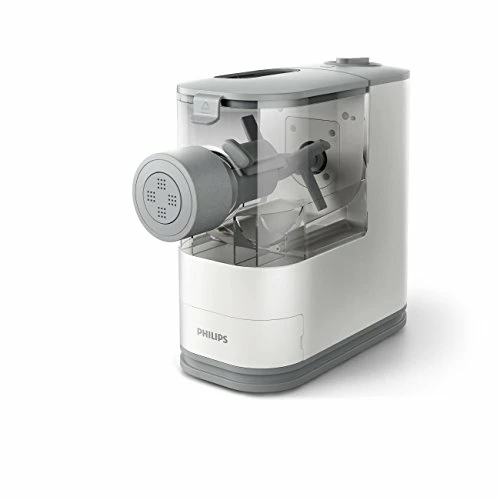
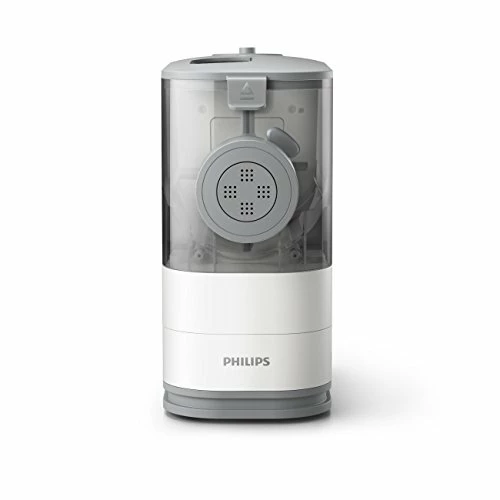
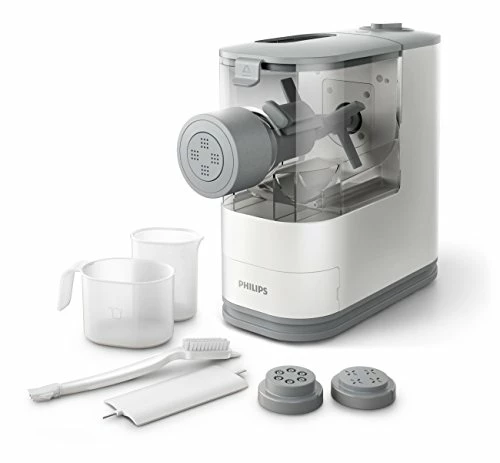


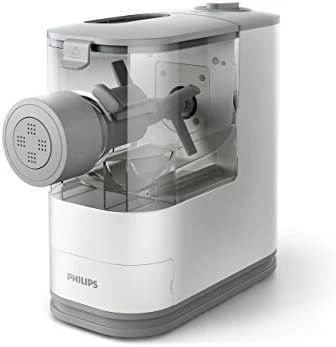
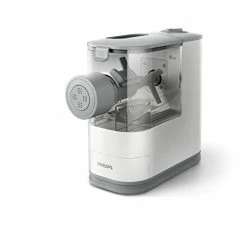
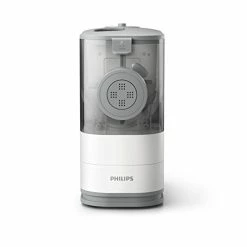
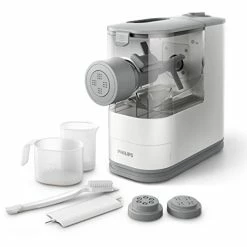
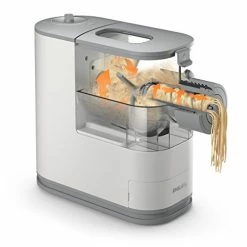
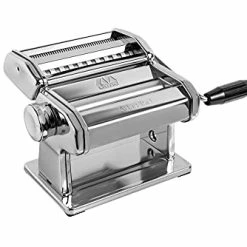
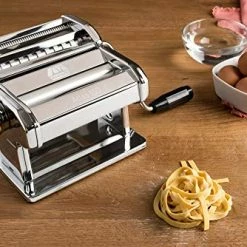
Cheapest 😍 Philips Kitchen Appliances Philips Compact Pasta And Noodle Maker With 3 Interchangeable Pasta Shape Plates – White – HR2370/05 👏
Original price was: $149.95.$85.00Current price is: $85.00.
- Buy quality, buy with us.
- Get the quality you deserve, for less.
- Your needs, our top priority.
- Multiple payment options for secure shopping with SSL

- Brand: Philips Kitchen Appliances
- Color: White
- Item Weight: 4700 Grams
- Item Dimensions LxWxH: 13 x 15.5 x 11.9 inches
- Included Components: Pasta Maker
- Number of settings: 3
- Operation Mode: Automatic
- Is Dishwasher Safe: Yes
- Is Electric: Yes
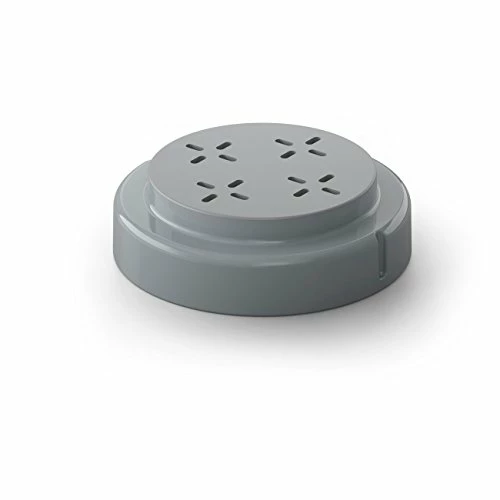
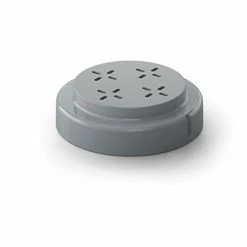
- Number Of Discs: 3
- Automatically kneads and extrudes 2-3 servings of fresh pasta in just 18 minutes thanks to uniquely designed stirring bar.. Cord length : 40 Inches
| Color | Black, White |
|---|
3 reviews for Cheapest 😍 Philips Kitchen Appliances Philips Compact Pasta And Noodle Maker With 3 Interchangeable Pasta Shape Plates – White – HR2370/05 👏
Add a review
Related products
-20%
Original price was: $14.99.$11.99Current price is: $11.99.
-39%
Original price was: $159.87.$98.00Current price is: $98.00.
-20%

Original price was: $29.99.$23.99Current price is: $23.99.
-20%
Original price was: $18.99.$15.19Current price is: $15.19.
-20%

Original price was: $5.95.$4.76Current price is: $4.76.
-20%
Original price was: $81.80.$65.44Current price is: $65.44.
-20%

Original price was: $28.98.$23.18Current price is: $23.18.
-20%


Original price was: $81.62.$65.30Current price is: $65.30.
Bocaboy –
I’ve owned a Marcato Atlas 150 pasta maker for quite some time, and so I’m familiar with making my own delicious noodles and pasta. I decided to give the Philips Compact Pasta Maker a try (versus it’s big brother) because we’re empty nesters and 2-4 servings would usually suffice for us.My first batch didn’t turn out well at all. Instead of interpreting the instructions for liquid correctly, I added 80 mL of water plus an egg. What I got was a mixture that was far too moist and couldn’t even extrude! It took quite a while to clean up the the pasta maker and remove the dough from the paddle and extruder. Not to be daunted, and recognizing my mistake, I tried again.My second batch was perfect. I used the basic recipe of 200 grams of flour to 80 mL (total) of liquid and the pasta started to extrude after about 3-4 minutes. It is a bit drier than what you’d expect if you’ve ever made pasta with a manual machine, but has the advantage of not sticking together when you trim it and place it on a plate or bowl. In addition, the dough doesn’t need to “rest” for 30 minutes before processing, a definite time saver.The cooked pasta was delicious. I boil my pasta with a healthy dose of salt in the water, and it had a freshly made taste that went perfectly with a homemade tomato sauce and meatballs. Cooking time to al dente was approximately 5 minutes.I think cleanup of the machine parts is a bit more work than using a manual pasta maker. With my Marcato Atlas 150, I never have to do anything but quickly wipe it with a damp cloth and put it away for the next time. The Philips has several parts that need to be cleaned, and the shaping disk really has to be cleaned by hand with the attachments to the scrapper blade. I haven’t tried using my dishwasher for cleanup, but the parts are supposed to be dishwasher-safe.Like most kitchen appliances, I suspect I’ll get better at using the Philips Compact Pasta Maker as I use it more. It reminds me a bit of the first time, years ago, when I purchased a Robot Coupe food processor. The first few times it seemed like more work than it was worth, but now the Robot Coupe has earned a coveted place on my limited kitchen counter and helps me prepare meals every day.Here are some tips from one new user to another.1. Weigh out the flour with a kitchen scale. I have an electronic kitchen scale from Amazon Inateck Digital Multifunction Kitchen and Food Scale, Stainless Steel, Accuracy 0.1 g (Measurement Range 0.5 g to 3 kg), 2 x AAA needed(not included) that measures grams or ounces. The plastic cup that is supplied by Philips is of limited use. 200 grams of flour mounds over the top and a level amount using this container is not an accurate measure. It makes more of a mess than is necessary.2. The other plastic measure supplied with the machine is used for liquid. I have great eyesight and the markings are very difficult to interpret. Unlike a Pyrex or Anchor measuring cup where the markings are painted red on clear glass, the markings on the cup are simply molded into the container and are very difficult to read. Use a real measuring cup to measure out the quantity of liquid you’re using and you’ll have an easier time.3. If you’ve ever made pasta dough manually, don’t be fooled by the dough’s consistency in the machine. The recommended basic recipe is the right ratio of flour to liquid. Making the dough too moist will result in a mess in the machine and a lot of cleanup. You’re better off erring on the side of less liquid than more.I’ll report back as I gain experience at using it. It would be nice if a pappardelle and lasagne shaper were available, but I understand that this is a new model for Philips and that those parts will be available in the future.UPDATE October 19, 2017: Tried making fettuccine with Red’s Semolina flour. I weighed out 200 grams and added the egg and water (80 mls) and the result was excellent. It’s not exactly the type of fettuccine I would make manually as it’s definitely a bit thicker, but very tasty and disappeared from everyone’s plate very quickly!UPDATE Friday, November 24, 2017: I have discovered that there are no other pasta disks for this machine as there are for the Philips HR2357. Disks made for HR2357 will NOT fit the compact pasta maker. I don’t know why they’re offered as add-ons on the same page, but believe me, they won’t fit. Hopefully Philips will consider making this machine even better by adding a sheet and pappardelle disk.UPDATE Monday, January 13, 2020: Philips has released a few more dough shapers for angel hair, ravioli and lasagna. I bought them but have yet to try them. Also, I found that by following the recipe included with the machine when using semolina results in a better pasta. I was using all semolina. Philips suggests 150 grams of semolina and 50 grams of all purpose flour. After trying both, I agree.One last note. The pasta made with this machine is thicker and a bit doughier than commercial pasta or pasta that you can make with a standard pasta machine, like an Atlas. The difference is that you can control thickness in a manual pasta maker. With the Philips, you can only use the extruding faces, so there’s no controlling the thickness of penne.
Josh and Jane –
What a crazy mess my first experience was! I’m surprised nobody else I can find mentioned the poor instructions in the black & white booklet that gives the wrong units of measurement for the egg/liquid ingredients. Instead of ml, like it’s marked on the included measuring cup, the manual’s written instructions labels the liquid in g, aka grams. I was thrown off by it and blame it in part for not getting good results the first try using semolina combined with whole wheat flour.I forgot to double the amount of egg & water to the 400 g doubled flour amount. It called for 150 g semolina and 50 g white flour. Liquid measure was supposed to read, 75 ml after you add 1 egg and top the liquid up to make it that amount. Double that would have been 150 ml. Instead, I was tearing my hair out wondering why it said to add grams instead of ml. My husband was probably right when he told me at that point that I shouldn’t have drunk any of the whiskey he had just brought home from a trip out to the local liquor store. lolI ended up with a big ball of dough that I knew, from past experience with an old machine I used to own, was too wet. I had to stop & rethink everything. I didn’t want to throw all that dough & egg away. I decided to split it into 2 halves & add another 100 g of flour, acc. to the included dry ingredients measuring cup, to each of the 2 separate batches I was about to remix.I didn’t have white AP flour I could use for adding to the dough. A few days prior, the new bag I just recently bought at the grocery store had a worm in the top when I opened it. I had to throw the whole bag away! I didn’t know I had another bag of white flour in storage until after I finished making the pasta in this machine! I found some bread flour I had in storage and added that in place of the white AP flour to the over-moist semolina dough mixtures.Somehow miraculously, it all worked out and I was able to extrude 2 good batches of pasta when all was said and done! FYI, I liked very much that the machine automatically went back to remixing the dough left in the machine so that it could extrude more of it out. But even after that, there was still residual dough left in it that it was unable to pick up and push through the extruder.The solution: take it out of the machine and push it back into the rectangular opening where the screw turning mechanism pushes it through to get it to extrude it. When you’ve done this enough times and you still have a small amount of dough left, make it into noodles by hand. Stretch it out between the palms of your hands and roll it into round noodle shapes. Having been a pottery artist for many years, this is very easy for me but I don’t think it’s hard for anyone to do.Another thing I had fun doing was pushing out the “buttons” of pasta dough that gets stuck in the dies, and cooking them in with the rest of the past without changing their shapes. You can reshape them if you want. And you can do the same with any and all the little bits of dough that gets left out.If you really want to get into it & you’ve made a bigger mistake that leaves a larger quantity of unextruded dough, you can get out your rolling pin. Roll the dough out into a flat sheet. Then cut it in noodle-shape slices. Where there’s a will, there’s a way!Another issue I had with the instructions is how it says to place the die on the opening by putting the non-existent arrow at the top. There are lines in die opposite each other but they don’t end up centered at the top if you push the die in firmly enough so that its little teeth fit into slots on the machine end that hold the die in place. This was very confusing. I didn’t know if I should keep the die loose and not push it into the machine or push it hard enough to make the teeth mesh with the gaps molded in on the machine. Very hard to describe the problem but if you’ve tried this, I think you’ll know what I’m talking about.Positives- I like the improvements they’ve made to this type of machine such as the built-in storage drawer on the bottom. The whole process being automatic from mixing to extruding is very nice. It’s nice and compact which is a big reason I bought this instead of the larger model. The scraper with metal rods built in at both ends is very handy for poking dough out of the holes in the dies when they need cleaning or if you need to clear a few holes while it extrudes and they get plugged up.Can’t wait to try this again with a better start the next time we want to eat pasta. Not sure if this machine’s motor is strong enough for it to last. I bought the added coverage in case it breaks down. I also bought the extra dies elsewhere that will fit this machine & await their arrival so that I can try them out.
Got 2 B Organized –
It did everything it said it would and turned out great. I was a bit short on the flour and about half way through my crumbly mixture was turning more into a straight ball of dough which made it harder and slower for it to come out. I quickly grabbed some oats and ground it and light sprinkled a bit over the dough hoping it was get crumbly again and it did and the rest came out. It was pushing out spaghetti within a few minutes like it said it would. I pre-boiled some salted water and the spaghetti took less than 5 mins to cook. The taste was great! Everyone liked it so that’s always a plus!! I’m very happy with my purchase and foresee lots more pasta eatin.